Update all php extensions at once with YUM

With YUM, upgrading php is simple as “yum install php”. This will install latest php version on your machine. But if you have multi different php modules that aren’t part of php package (eg. gd, mysqli …), than you can use this simple one liner and install all those modules at once.

Just run this as root:

php -m | grep -v "Modules" | while read i; do yum install php-$i -y; done

This will check for all currently installed php packages and will try to upgrade them.

malware acl condition: clamd: unable to send file body to socket (127.0.0.1)

If you see error like this in your mail logs, than chances are that your ClamAV is not able to process attachments files larger than limit set in clamav configuration. In this case, sender which sent email with larger attachment to your server, will get something like this in respond:

[10.10.10.10] #<[10.10.10.10] #5.0.0 smtp; 5.4.7 - Delivery expired (message too old) [Default] 451-'Temporary local problem - please try later' (delivery attempts: 75)> #SMTP#

In your mail log you’ll see something like this:

+++ 1e248B-000NMy-T6 has not completed +++
1969-08-15 01:40:21 1e248B-000NMy-T6 malware acl condition: clamd : unable to send file body to socket (127.0.0.1)
1969-08-25 01:40:21 1e248B-000NMy-T6 H=some.hostname.com [1.1.1.1] X=TLSv1:RC4-SHA:128 CV=no F=<prvs=449d2f142=senders@email.com> temporarily rejected after DATA

To solve this, open your clamav.conf file (/etc/clamav.conf or find your location) and change value for StreamMaxLength according to your needs. Default value is 25M.

Don’t forget to restart your ClamAV.

Macbook Pro – assign escape to section/paragraph key on OSX Sierra

If I’m honest, this touch bar that new Macbook Pro brings keeps me cold. As system administrator I’m forced to use ESC a lot. This “virtual” escape button on touch bar is annoying as hell. But there is way to make escape button physical again. Sierra brought simple solution to assign escape to caps lock button. Not very good solution in my opinion. I have international keyboard and paragraph/section (§) key is unused – I don’t recall that I ever used section key. So I assigned escape function to section key which is also near to position where escape button used to be, so that makes it even more great.

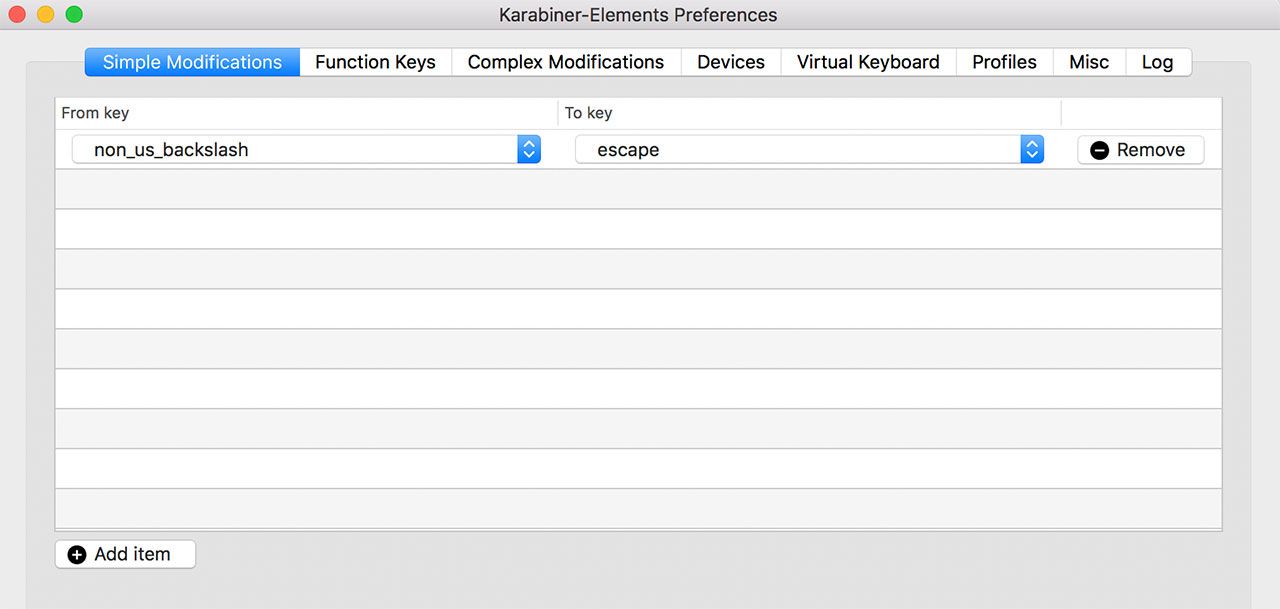
First I installed this Karabiner-Elements. Then you must create simple rule. I was confused when assigning “From key” because section key wasnt there. It turns out that you have to select non_us_backslash option and then assign “To key” escape.

It should look like this:

I hope that this helps anyone 🙂

Limit xmlrpc.php to only specific web clients

Xmlrpc.php is very common target of attacks. In most cases you don’t need xmlrpc, but if you use third-party apps like WordPress for iPhone or android or other editors, then xmlrpc is the one who communicates between them and your WordPress installation. If you’ll be using it, it can be good idea to limit access to it only from “browsers” that you are using to access it. In case bellow, I’m using iPhone WordPress app.

When access to xmlrpc.php via iphone app, you’ll see that access log looks like this:

[11/Jun/2017:19:45:08 +0200] "POST /xmlrpc.php HTTP/2.0" 200 462 "-" "Mozilla/5.0 (iPhone; CPU iPhone OS 10_3_2 like Mac OS X) AppleWebKit/603.2.4 (KHTML, like Gecko) Mobile/14F89 wp-iphone/7.7"

From this you can see that wp-iphone/7.7 is named as client. So this will be our key for nginx configuration. We’ll make rule that will only accept requests to xmlrpc.php from clients containing string “wp-iphone”. Other clients will be denied. This is not bulletproof of as web client can be easily spoofed, but it should block majority of attacks.

location = /xmlrpc.php {
if ($http_user_agent !~* "wp-iphone")
{
return 403;
}
include fastcgi_params;
fastcgi_pass 127.0.0.1:<your_php_fpm_port>;
}

WordPress bruteforce protection with NGINX and limit_req / request limitation

WordPress installations are very common targets of brute force attacks. With this attacks, attacker tries countless username and password variations in order to guess login informations. As you can imagine that such abusive behavior on your WordPress can cause collapse of server. Very common are attacks on wp-login.php and xmlrpc.php. There is a simple way to limit allowed number of requests on specific file with limit_req. This module can limit processing rate of requests coming from a single IP address on your web server.

In order to protect your WordPress administration you can do something like this:

# prevent brute force attacks on wp-login.php
 location = /wp-login.php {
        limit_req zone=one burst=5 nodelay;
        include fastcgi_params;
        fastcgi_pass 127.0.0.1:9000;
 }

This will allow 5 request in 5 second “window”. When there’ll be more than 5 request in 5 seconds, Nginx will return 503 error until request rate slows down:

$ curl -I https://www.yourwebsite.com/wp-login.php 
HTTP/1.1 503 Service Temporarily Unavailable
Server: nginx

Of course, you can use limit_req to protect other systems besides WordPress to.

Migrate email to gmail with imapsync – Host2 failure: Error login

So you want to migrate your emails from your hosting to your Gmail and you can’t get it to work with imapsync? You triple checked your login credentials and are correct but transfer still doesnt work. So what is causing error bellow?

Host2 failure: Error login on [66.102.1.108] with user [mymail@mydomain.com] auth [LOGIN]: 2 NO [ALERT] Please log in via your web browser

You have to login to your Google Apps settings (Security -> Advanced security settings) and change value for Less secure apps to: Enforce access to less secure apps for all users. Than it should work.

PHP: SSL operation failed with code 1

If you installed PHP 5.6 or grater and your application returns something like this:

SSL operation failed with code 1. OpenSSL Error messages: error:14090086:SSL...

Then there is a simple fix for that. You can override default OpenSSL’s CA bundle with the one bellow.

  1. Download this cert bundle.
  2. Add this line to your php.ini file
    openssl.cafile=/path/to/your/downloade/cacert.pem
  3. Restart apache/nginx and you should be ok.

check_eximailqueue: query returned no output! [FIX]

If you are icinga/nagios user and dealing with exim, you probably know for wonderful plugin check_eximailqueue. This plugin warns you when there are specific amount of email in your exim mail queue. Usually this indicates spam.

I installed this plugin on CentOS 7 with Directadmin installed. When I was executing plugin locally, it worked fine. But when I tried to execute it remotely (from Icinga server), it failed.

This was error returned when executing from Icinga server:

> # /usr/local/libexec/nagios/check_nrpe -H my.serverhostname.com -c check_exim_queue
Mailqueue WARNING - query returned no output!

I added “nagios  ALL=(ALL) NOPASSWD:/usr/sbin/exim” to my /etc/sudoers file but error still persisted. I manually set Exim and sudo path in script. Error was still there.

If you check your nrpe process, you’ll see that it runs by nrpe user and not nagios!

[root@da ~]# ps -aux | grep nrpe
 nrpe 26993 0.0 0.0 46356 1460 ? Ss 10:44 0:00 /usr/sbin/nrpe -c /etc/nagios/nrpe.cfg -d

Solution is very simple. Just change “nagios ALL=(ALL) NOPASSWD:/usr/sbin/exim”  to “nrpe ALL=(ALL) NOPASSWD:/usr/sbin/exim”  in your /etc/sudoers – replace user nagios with nrpe. It should work.

I hope it helps 🙂
Directadmin – block zip attachments with ClamAV and Exim

A lot of viruses and malware is sent in emails with zip attachments. Sometimes your antivirus like ClamAV wont catch nasty email. This is a big problem when you receiving tons of this kind of messages. So if you’re receiving tons of nasty emails containing zip attachments with viruses in it, good way to solve this is by simply reject emails with zip attachments. This was done on Directadmin server with Custombuild 2.0. Even if you’re not using Directadmin, configuration for ClamAV should be very identical.

  • If you built Exim and Clamav with Custombuild 2.0, than you should see this line in your /etc/exim.conf. Uncomment if it’s not already. If you’re using Custombuild 1.2, then this should be changed in /etc/exim.conf directly – settings in step 2 bellow.
    .include_if_exists /etc/exim.clamav.conf
  • Open file /etc/exim.clamav.conf and find word demime within that file. Then simply add zip to it. It should look like this:
    #1.0
    deny message = This message contains malformed MIME ($demime_reason)
    demime = *
    condition = ${if >{$demime_errorlevel}{2}{1}{0}}
    deny message = This message contains a virus or other harmful content ($malware_name)
    demime = *
    malware = *
    deny message = This message contains an attachment of a type which we do not accept (.$found_extension)
    demime = bat:com:pif:prf:scr:vbs:zip
    warn message = X-Antivirus-Scanner: Clean mail though you should still use an Antivirus

Now any email with zip attachment will be rejected. Sender will receive error message like this:

The error that the other server returned was: 
550 This message contains an attachment of a type which we do not accept (.zip)

fail2ban – Error in FilterPyinotify callback: illegal IP address string passed to inet_aton

Just recently, I discovered great pice of software named fail2ban. Supreme way to provide some additional security to your server. But more about fail2ban next time. So, I configured my jail.local configuration, but getting errors in error log. This was the error:

Error in FilterPyinotify callback: illegal IP address string passed to inet_aton

Error is pretty self explanatory, my whitelisted IP’s defined in variable ignoreip were wrong. If you use commas (,) like I did, then there is your problem. Just replace commas with spaces and it should work fine.

© 2024 geegkytuts.net
Hosted by SIEL


About author